Your freedom-loving labor lawyer is back with more tips on how to beat inflation. You may not be ready to butcher backyard chickens, but you can still push the needle toward more self-sufficiency — by making your own sourdough breads.
Why bother baking with sourdough? It’s dirt cheap. You know exactly what your family is eating — no high fructose corn syrup, excessive sodium, or chemical preservatives. You can easily stockpile flour, in the freezer or 5-gallon buckets (remember two years ago when the supermarkets ran out of bread?) Plus, your house will smell amazing. Nothing beats the aroma of fresh-baked bread.
You may think you don’t have time for sourdough. This all depends on your goals. I have a friend who spends two days laminating layers of buttery flour to make fancy French puff pastry. I have other friends who bake beautiful artisan loaves to sell at the farmers’ market.
While I appreciate artistic baking, self-sufficient baking — what I call minimalist sourdough — flexes to fit the busy lifestyle. Follow these simple steps and you, too, can find time for home-baked bread.
Starting with Starter
If you don’t have sourdough starter, one of your friends probably has some to share. Otherwise, you can order a starter online, or make your own in about a week.
Sourdough starter is a live mixture of yeast and bacteria. It looks like bubbly pancake batter and smells like beer. I house my starter in a tall mason jar. The starter needs to breathe, so I cover the jar with a paper towel, secured by the metal jar ring. (You can use cheesecloth and a rubber band also).
Because sourdough is alive, you have to feed it. Fortunately, this is not burdensome. Once a day, just add a heaping spoonful of flour, and an equal amount of water, and stir. If you are using your starter often, feed it more. If you want to give your starter a rest, put it in the fridge for a week. At the end of the week, take it out and feed it for a day or so before using it (or just put it back in the fridge).
Your starter may start to dry out, especially in the fridge. No worries! Just remove the dry crusty part, and feed it normally. Your starter may collect liquid at the top, especially if you skip a day or two of feeding. Again, no worries, just feed it normally. Starters are very forgiving. (However, if your starter develops “off” colors or smells, you may want to start over with a fresh starter).
The Right Tools
For minimalist sourdough baking, you will need a heavy Dutch oven with lid, either cast iron or ceramic. Sourdough does not bake well in traditional loaf pans. This is because the dough is wetter than traditional bread dough, and because the lengthy rising time changes the composition of the starches. (For this reason sourdough has a lower glycemic index, good for those who are watching carbs.)
Other tools include a mixing bowl, spatula, liquid measuring cup, dry measuring cup, and plastic grocery bag.
The Basic Bread Recipe
Here is my recipe for a medium-sized loaf. You can scale up or down depending on your family’s needs. The ingredients are flour, water, starter, a little bit of salt, and a little bit of oil.
- Dump 3 cups all-purpose flour and ½ tablespoon salt into the mixing bowl. Stir with the spatula.
- Pour ½ cup starter into the liquid measuring cup. Add water to the measuring cup until you reach the 2-cup line. Use the spatula to stir the water and starter together. (Don’t forget to feed your starter before putting it away).
- Pour the liquid ingredients into the dry ingredients. Use the spatula to stir and scrape the sides of the bowl. Soon, the dough will cohere into a sticky, shaggy ball.
- Pour a little oil into the mixing bowl. Use the spatula to turn the dough ball around until it is lightly covered in oil. This helps keep the dough moist.
- Cover the bowl with a plastic grocery bag or shower cap. Then let it rise for 8-10 hours. I like to make dough at night and let it rise overnight, or make it in the morning to bake for dinner.
A note on rising: Unlike other recipes, minimalist sourdough is flexible on rise time. The dough will rise faster where it is warmer, slower where it is cooler.
The dough has risen enough when it is puffy and bubbly all over, but you can leave it longer if you need to. Just don’t let it dry out — that’s what the plastic bag is for. You can speed things up using the “proof” setting on your oven, or the “low yogurt” setting on your InstantPot. (I have been able to reduce rise time to 4 hours that way). But your kitchen counter works just fine.
Bake it
Once the dough has risen, take your Dutch oven and its lid and put those in the oven. Preheat to 450 or 500. After the preheat, carefully remove the Dutch oven and take off the lid. You don’t need to grease the Dutch oven — if it is hot, the dough will not stick during baking.
Loosen the dough from the mixing bowl with the spatula. Then use the spatula to scrape the dough into the hot Sutch oven. Try to get it all in one big plop (but if not, just keep scraping out the bowl and mounding the dough up). Note that, if you use a large Dutch oven, the bread will be free-form. If you use a smaller Dutch oven or loaf baker, the bread will take the shape of the baking container.
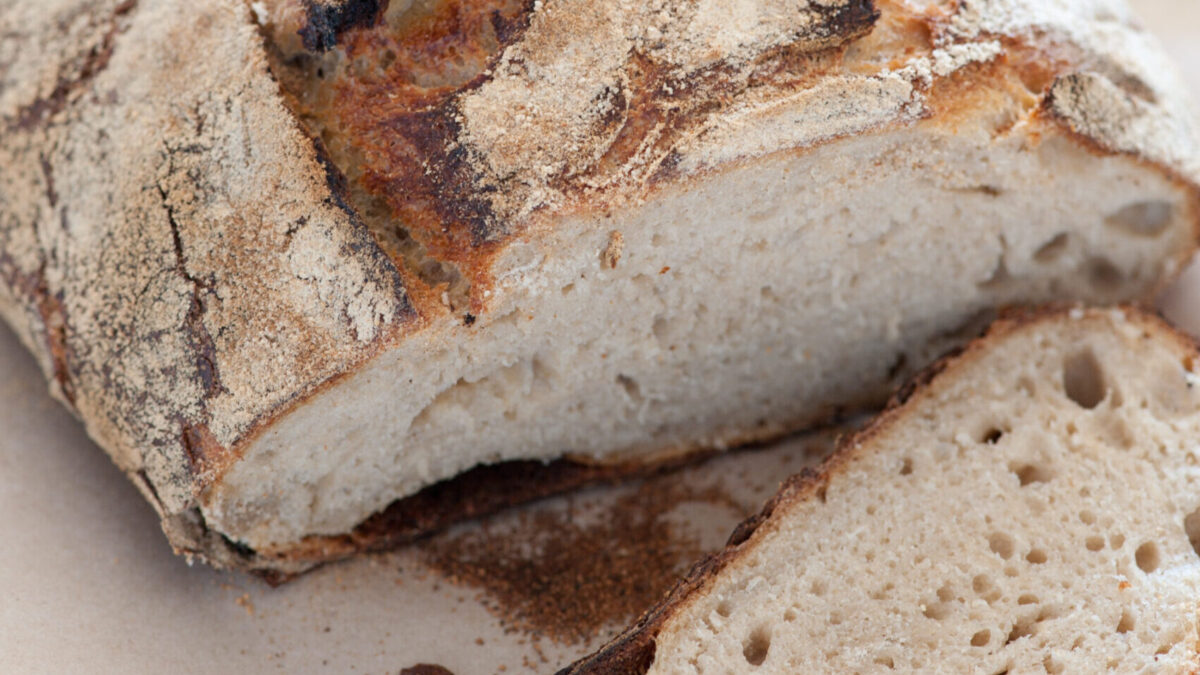
Put the lid back on and place the whole thing in the oven. Set a timer for 40 minutes. After about 20 minutes, the lid has done its job, so you can remove it. This also allows you to monitor the color. Once the bread is light yellow-brown on top (about 40-45 minutes), you can take it out of the oven. Minimalist sourdough, due to its long rise time, is generally lighter in color than other recipes.
Carefully turn the bread out of the dutch oven and let it rest. The bread will smell really good and you will want to eat it right away. Resist! If you let it cool, the slices will come out nicer and you will also avoid problems with a gummy, undercooked interior. Make sure to use a bread knife. And lots of butter.
Variations on a Theme
Minimalist bread is easy to personalize. You can enrich the bread by adding egg, butter, or milk. I would start with no more than ¼ cup of these ingredients, because they weigh down the rise. You can also add a spoon or two of sugar or honey.
Mix-ins include grated cheese, chopped jalapenos, or chopped green onions. As a sweet alternative, you can add raisins, craisins, or other dried fruit or nuts. I have made a Thanksgiving version with ¼ cup of canned pumpkin and a cup of craisins. You can also add ¼ cup of oatmeal or cornmeal for a more rustic loaf.
Legal Disclaimer
Minimalist sourdough will not be as light and fluffy as store-bought bread. Adjust your expectations, and cut the slices as thin as possible if you are making sandwiches, so the filling is not overwhelmed.
In addition, minimalist sourdough does not last as long as store-bought bread, because it doesn’t have all of the chemicals and preservatives. I try to make the amount that my family can eat in 2-3 days. I have found that adding ¼ cup of cooked starch (for example, leftover cooked oatmeal or mashed potato) helps keep the bread fresh longer. You can also use stale bread for toast, French toast, or croutons.
Flatbreads Galore
Minimalist sourdough is not just for bread. You can make inexpensive and delicious tortillas and crackers with your starter.
For crackers, mix ½ cup starter, ½ cup flour, and 2 tablespoons oil. Season as desired. Roll thin on parchment paper, score with a pizza wheel, and bake at 350 degrees for 20-25 minutes.
For tortillas, mix ¼ cup starter, 1 cup flour, 2 tablespoons oil, and 2 tablespoons water. Divide into 4-6 balls. Press each ball with a tortilla press lined with plastic wrap. Dry-fry the tortillas in a hot cast iron pan, about 1 minute per side or until they develop light brown blisters.
It’s not hard to reduce your dependence on highly processed, expensive baked goods. Minimalist sourdough is one of my favorite ways to fight inflation and feed real, healthy foods to my family. Resistance starts in your own kitchen.